Browsing Tag

diy wedding

Saturday Craftacular

Uncategorized


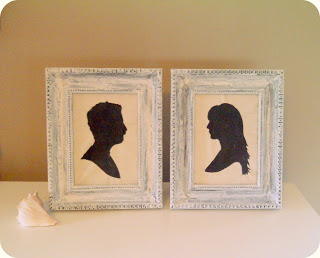
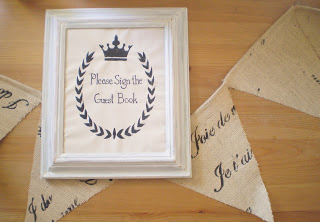
I spent all day gathering, painting, and crafting finishing touches for the wedding. We are keeping the decorations to a minimum – Dan and I are pretty simple when it comes to our taste. I did want to have something “special” for the head table. I created a bunting to drape across the front, and today, after finding some great frames at the dollar store (which were jazzed up with some crackle medium, white paint, and sand paper), I decided to make “portraits” of Dan and I.
I took a profile picture each of us, turned it black and white, and upped the contrast. I printed it on some heavy cardstock, carefully cut around the lines of our profiles, and used the negative as a stencil. I stencilled on plain old muslin with some black acrylic paint. I’m really happy with how these turned out.
I grabbed a great old tin wash-basin from an antique store to put our wedding programs and bird-seed confetti bags in, as well as some old lace-trimmed linens.
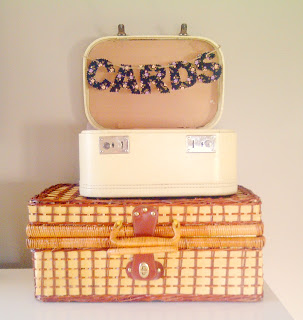
I’m a little worried about what I will craft when this wedding is all over…

Wedding Card Boxes

Uncategorized


I am down to 3 weekends before the wedding weekend! I wanted to add a few more décor items to add to my “vintage” theme, and I noticed The Knot had a whole gallery of vintage themed décor ideas.
I took two ideas – Paper Cut “Cards” Garland and the Vintage Train Case, and mashed them together. Instead of using paper, I glued a piece of cotton to a piece of card stock, printed large Bold Letters on another piece of card stock to use as stencils – traced my stencils (backwards!) on the card stock with the fabric glued to it, and cut out my letters with pinking shears. I draped the garland across the train-case and fixed with with small pieces of tape.
All of our RSVP’s are supposed to be back by today – so this weekend we will catch up with the stragglers, and finish off all of our crafts based on the final headcount. I have designated Dan to be “Official Hole Puncher” for our craft-night, since the last time I used a hole punch I managed to somehow get my fingers under the cutter twice and punched pretty painful holes in my fingers. Crafting is a dangerous business, don’t let anyone tell you otherwise!
We have also made a few plans to our honeymoon. Because of Dan’s brief stint of unemployment, and my voluntary cutting back of hours at work (though I did get a raise!), we decided to cancel honeymoon plans and just do a roadtrip based on whatever we can afford at the time. We will head up to the Bruce peninsula, ferry to Manitoulin Island, Camp at Killarny Provincial Park, tour through Sudbury and North Bay, Camp at Restoule, and wind our way back home again.

29 Days

Uncategorized
Today is 29 days until the wedding. What do I have to do?
  1. Purchase the bunches of flowers for the table arrangements, which I am doing tonight.
  2. Alter 1 bridesmaids dress
  3. Hem 1 flower girls dress, and complete sewing the other
  4. Order the wine
  5. Confirm the guest count with the caterer
  6. Order the favors
  7. Complete the programs & birdseed bags based on final guest count
  8. Provide the DJ with a song list
  9. Purchase mason jars for the flower arrangements
  10. GET A MARRIAGE LICENSE!
I’m so looking forward to the big day, and I can’t wait to see all of my friends and family all together again – I think that’s one of the best parts of getting married.
I have no expectations of how this is supposed to go, but I do have some hopes for the big day. I hope it doesn’t storm, I hope people stay out of the way of my ceremony, since it is happening in a public park! I hope I don’t feel awkward having my picture taken (camera shy!), and I hope I don’t trip over my dress.
What have I learned from my DIY wedding? People will tell you the the wedding is “your big day,” which is a partial truth and really should come with a caveat. The wedding is all about the Bride & Groom, but only after thorough consultation from everyone involved in the wedding. It is a practice of compromise, consideration, and care, which I guess is a lot like a marriage. The most important key to a happy wedding, is diplomacy.
I’ve really enjoyed (most of) the process (NOT the Wedding Trade Shows!!!), and can’t wait for the big day… and then the day after when we can relax and enjoy our lives as newly weds! Then… have some babies! I’ve been spending too much time with my best friend’s adorable, little ginger-baby. Between that, and reading about Jennie’s second pregnancy at Two Skinny, One Fat, and Little Lucy over at The Vintage Wife, I’ve got the baby-fever bad…
As a reward for my awesome wedding-planning skills, I treated myself to some perfumes from For Strange Women on Etsy a few weeks ago and I got them in the mail two nights ago. I’m positive I ordered from her years ago, but I think she was using a different name, because the scents are so familiar! I absolutely love the way they are packaged, and I feel like a dainty Victorian Lady every time I use them. My favorite is November, which coincidentally is also my favorite dreary month. I’m wearing Astral Projection today, which is a citrus-y scent. I find the scents smell even better when applied and settled into your skin for a few minutes. What surprised me the most, was how long lasting the scents are…

“Silk Screened” Groomsman’s Ties

Uncategorized
I wanted to buy ties off of Etsy that were silk screened with the grooms-people’s monograms… unfortunately the seller did not respond to any of my emails requesting pricing and some more specific information… So, I sent the ties to Toronto to be screened, but we could only find people who could do the iron-on-transfers… I decided I’d just have to do it myself.

So I googled “DIY Silk screening” or something along those lines, and found a great tutorial on how to turn a piece of organza, some Mod Podge, and an embroidery hoop into a silk screen. I picked up some fabric ink and voila.
Essentially, all you do is paint around the “negative space” with a thick enough layer of glue to fill in all of the holes. I then scraped a generous layer of the “ink” over the screen (after it had dried), and you have your image. It would have been easier with some emulsion, but this was the next best thing.

I’ve really enjoyed printing on fabric – like I did with my buntings (just used a paper stencil for those), and I’m going to start experimenting with some more “complicated” screening, using different colours and screens.
It’s hard to believe but we’re only 30 some odd days until the wedding… Sunday afternoon was my Bridal Shower which was unbelievably amazing. My cousin went above and beyond and set her already beautiful up like a country tea-party, with a variety of iced teas and the most delicious food. I was spoiled beyond belief with gifts, and received the nicest “guest book” signed by all of the generous ladies who attended – so many of them had such nice things to say about me, it brought a tear to my eye when I read it after I got home. Dan’s Mom gave me an heirloom dress, made by her aunt – it’s beautiful and I’d like to wear it the day after the wedding.
I feel somewhat undeserving of all of this attention, just because I’m getting married, but I am enjoying it! It’s nice to be reminded that you’re loved.

6 weeks ’til W day!

Uncategorized

The count down is officially on. I have 6 weeks until I am a “Mrs.”
I finished off my last two Etsy orders and have put Ohhh Lulu on Vacation Mode. I’ve jumped head first into wedding crafting.
Last night I went a little stencil crazy – hand cutting stencils, words, phrases, laurels, flourishes… I stencilled french lovey-dovey phrases on some rough, natural coloured burlap, and cut them into a bunting banner to drape across the head table. Because I made my own stencil, the bunting cost me less than $10 to make, and I have a ton of burlap left over, enough to likely make 3 more buntings.
Our ceremony is going to be very informal – no seating, just standing room, no ushers… so I wanted to have “help yourself” signs for the programs and birdseed bags, as well as a “Sign the Guest Book” sign for on the guest-book table. I picked up two picture frames from a charity shop for $3 a piece, cut a stencil out of cardstock, and painted on some scrap muslin.
I am getting so excited to see the whole thing come together!

Wedding and Ohhh Lulu News!

Uncategorized
The wedding is coming so fast now. For the longest time it felt like I had so much time to plan and decide on things, and now it’s a month away!

I got to work on my wedding programs this year. I used blank greeting cards as my “cover”. They were on sale at Zellers (soon to be Target, which makes me sad) for $11 for 40. I picked up two and will use the left overs for Thank you Cards for my Shower.

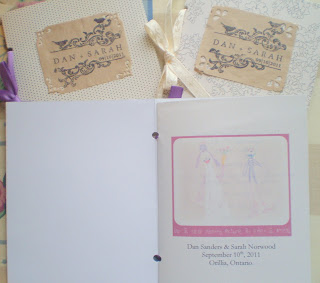
I used a “Marrying Picture” My soon to be nieces drew of Dan and I as the cover page. You can’t really see it very well, as the picture got kind of washed out (I need a new camera), but you get the idea.
The middle has all the usual boring “thank you” and who’s-who and order of ceremony, by my favorite part is the past page, where I put in a wedding-day word search! I used Puzzle-maker.com to generate a word search and just copy and pasted it into my booklet.

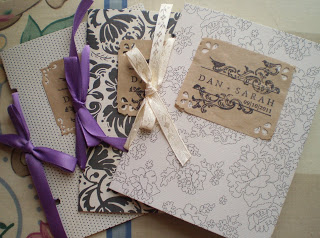
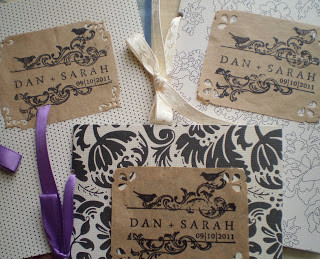
I bound the booklets by punching a hole about 1″ down from the top and bottom edge, along the fold. This actually makes quite a nice binding. A word of warning – punches can be very sharp, and if you are punching while sleepy, you run the risk of punching nearly all the way through your finger-tip, like I did. Not pleasant. We stamped on paper bags for the front page title, cut them out roughly and made the corners fancy with a paper punch you can get at any craft star. All in all our programs cost us $45 – would have been less if I had already had a fancy corner punch… that cost about 1/4 of the cost of the invitations.

So, we have our programs, birdseed bags, invitations mailed and are starting to return, ring pillow, 1 of 2 flower girl dresses, place cards, guest book, chalkboards (and easels) for seating arrangements… What else am I forgetting?
I’m looking forward to the big day. I picked up my dress last week and it is so beautiful, looks really cute with the shoes and the shoe clips I bought off of Etsy. I am looking forward to relaxing a little after the wedding…
And here is the BIG news. I am going to be devoting a lot more of my time to Ohhh Lulu in the very near future. I’ve been doing a lot of thinking and I’ve decided, after the whole heartbreaking house cafuffle, that I need to do this. We have nothing to lose. I talked to my boss last week about either not renewing my contract, or proceeding with just a couple days a week. This is super scary and exciting for me… as well as a huge relief – my “Day Job” has changed considerably since I started and as much as I’ve tried I just am not cut out for the lube business. I think anyone who has been following my blog can tell, I’ve been burning the candle at both ends for too long. I’m so excited to really “live my dream” even if it means it’s a huge failure, at least I can say “I tried.”


No camping this weekend…

Uncategorized

Dan and I did not get out to do any camping this weekend… instead I stayed home and filled a bunch of orders and finished a little sewing for the wedding.

I ended up going for headbands, despite the great and thoughtful advice I had gotten on hair clips. It was easiest for me just to do one thing and if the girls find them uncomfrotable, they can take them off during the evening. Two of my three bridesmaids have short-ish hair so the bands should work for everyone… I hope. And if not, you can all say “I told you so!”
I bought a bunch of thin metal headbands off an etsy seller, wrapped them in a strip of dupioni, cut on the bias, stitched the ends down (then plastered it in Fray Check), and then hand sewed the appliqués on. I hope the girls like them.

I also got a start on the flower girl dresses. I didn’t want anything too “princess-y”, so I picked up some coarse linen, seersucker in black and white stripe, a silk eyelet, and some ivory dupioni, as well as pattern.
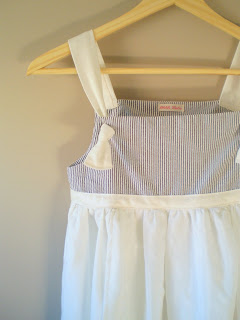
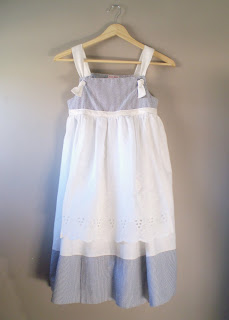
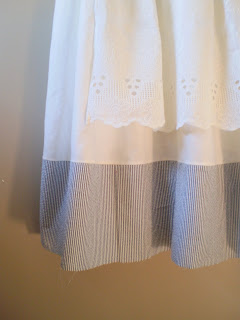
The dress only took me a about 2 hours to make and $40 worth of materials. Now I just have to make another one because I have 2 flower girls!
I really like how it turned out and I hope the girls have fun wearing them.