Browsing Tag

Vintage Patterns

New To Me Pattern…

Uncategorized
I have finally gotten around to watching Mad Men… and in a week I’ve watched the first two seasons and am well into the 3rd.  When I sew, I like to have something on the TV.  Usually I watch some cheesy documentary on Big Foot or UFO’s, or a Creature Feature (The Legend of Boggy Creek, anyone?), but I thought I’d give Mad Men a try… needless to say I’m totally hooked.  The costumes  alone are absolutely amazing.  I was super excited when I was browsing through Ebay the other day and came across this 1960’s bra pattern – very Mad Men-esque.  Cant wait until I have some time to give it a try!

Ohh La La Pin Up Sew Along Pt 2… Preparing your Pattern and making adjustments for Long Line Version.

Uncategorized
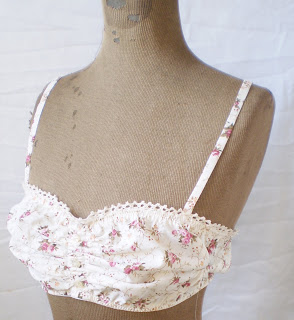
Before we cut and sew our beautiful fabric, we will have to prepare our pattern and make a muslin.  Vintage patterns can be tricky, so it’s important we test our fit.  If you are making the longline bra, you may also want to make some adjustments.

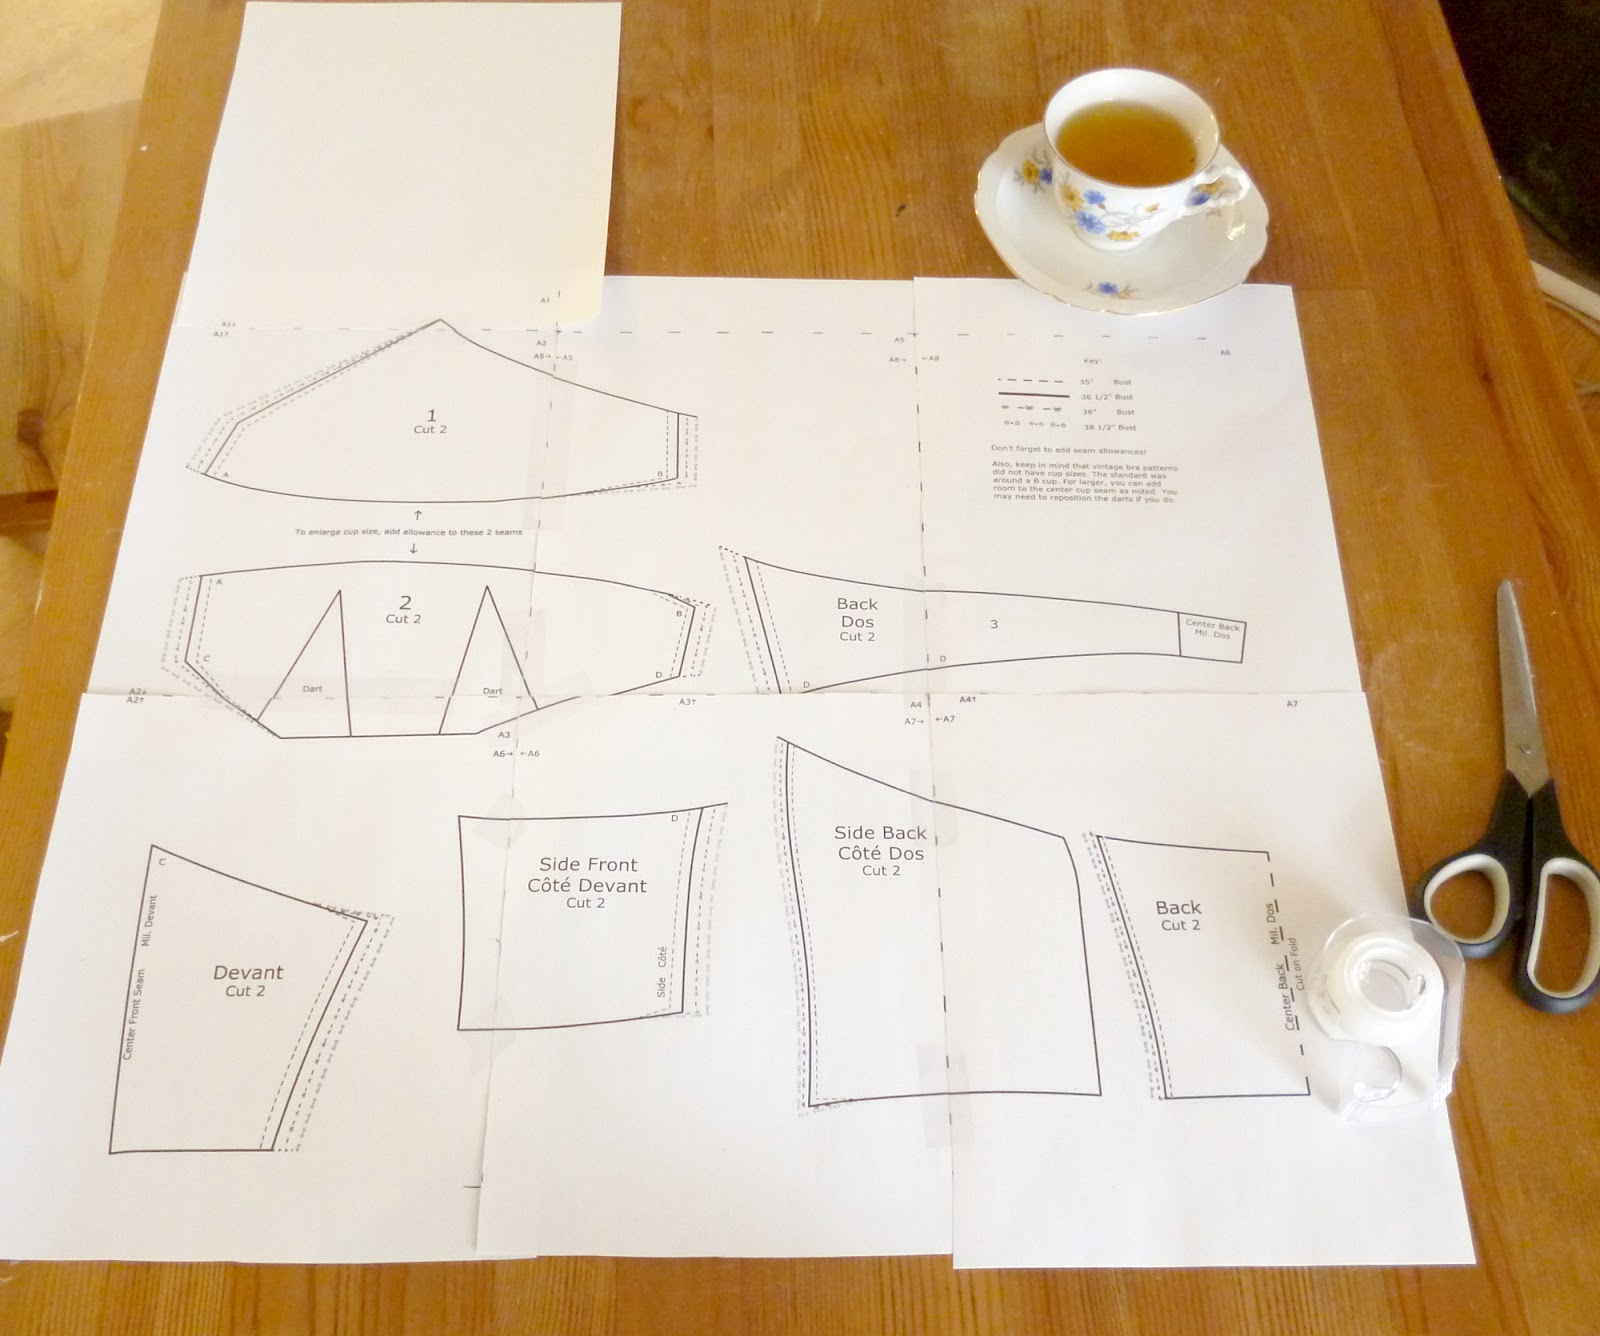
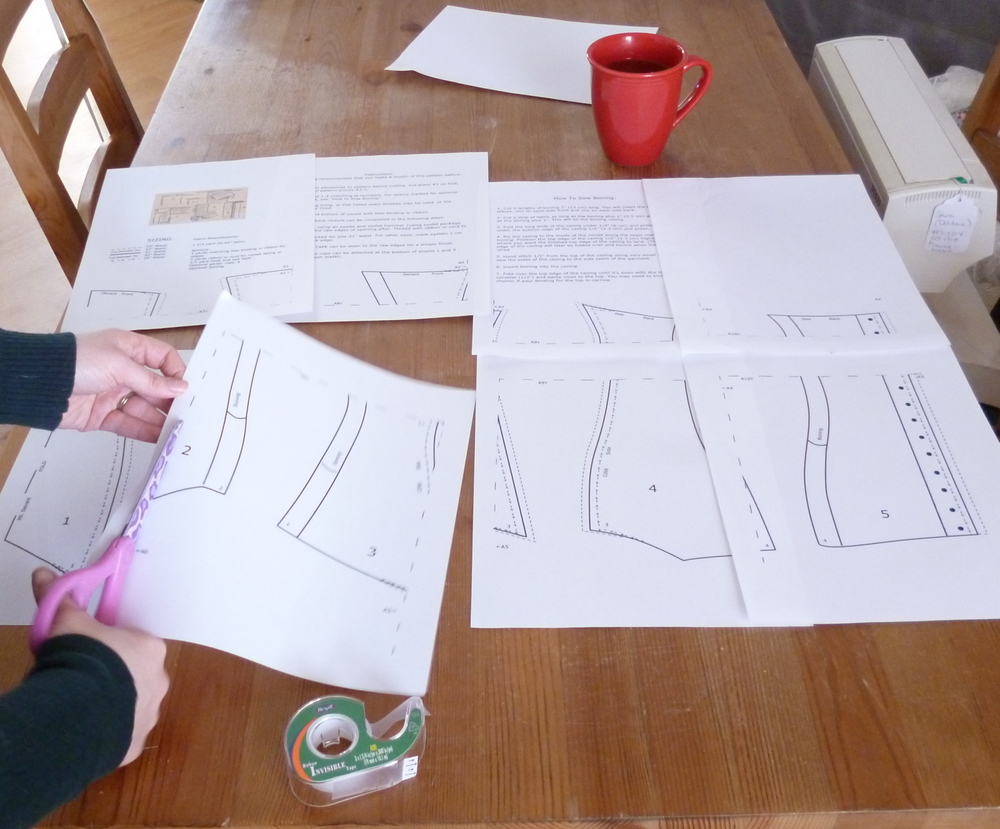
 Start by printing and assembling your PDF pattern.  Not sure how to do this? Follow Anna’s instructions from the corset section of our Sew Along.

I am making some alterations to my pattern, so I am tracing mine out, but Anna has added enough space between pattern pieces for you to add the Seam Allowance directly to the pattern if you wish to do so!

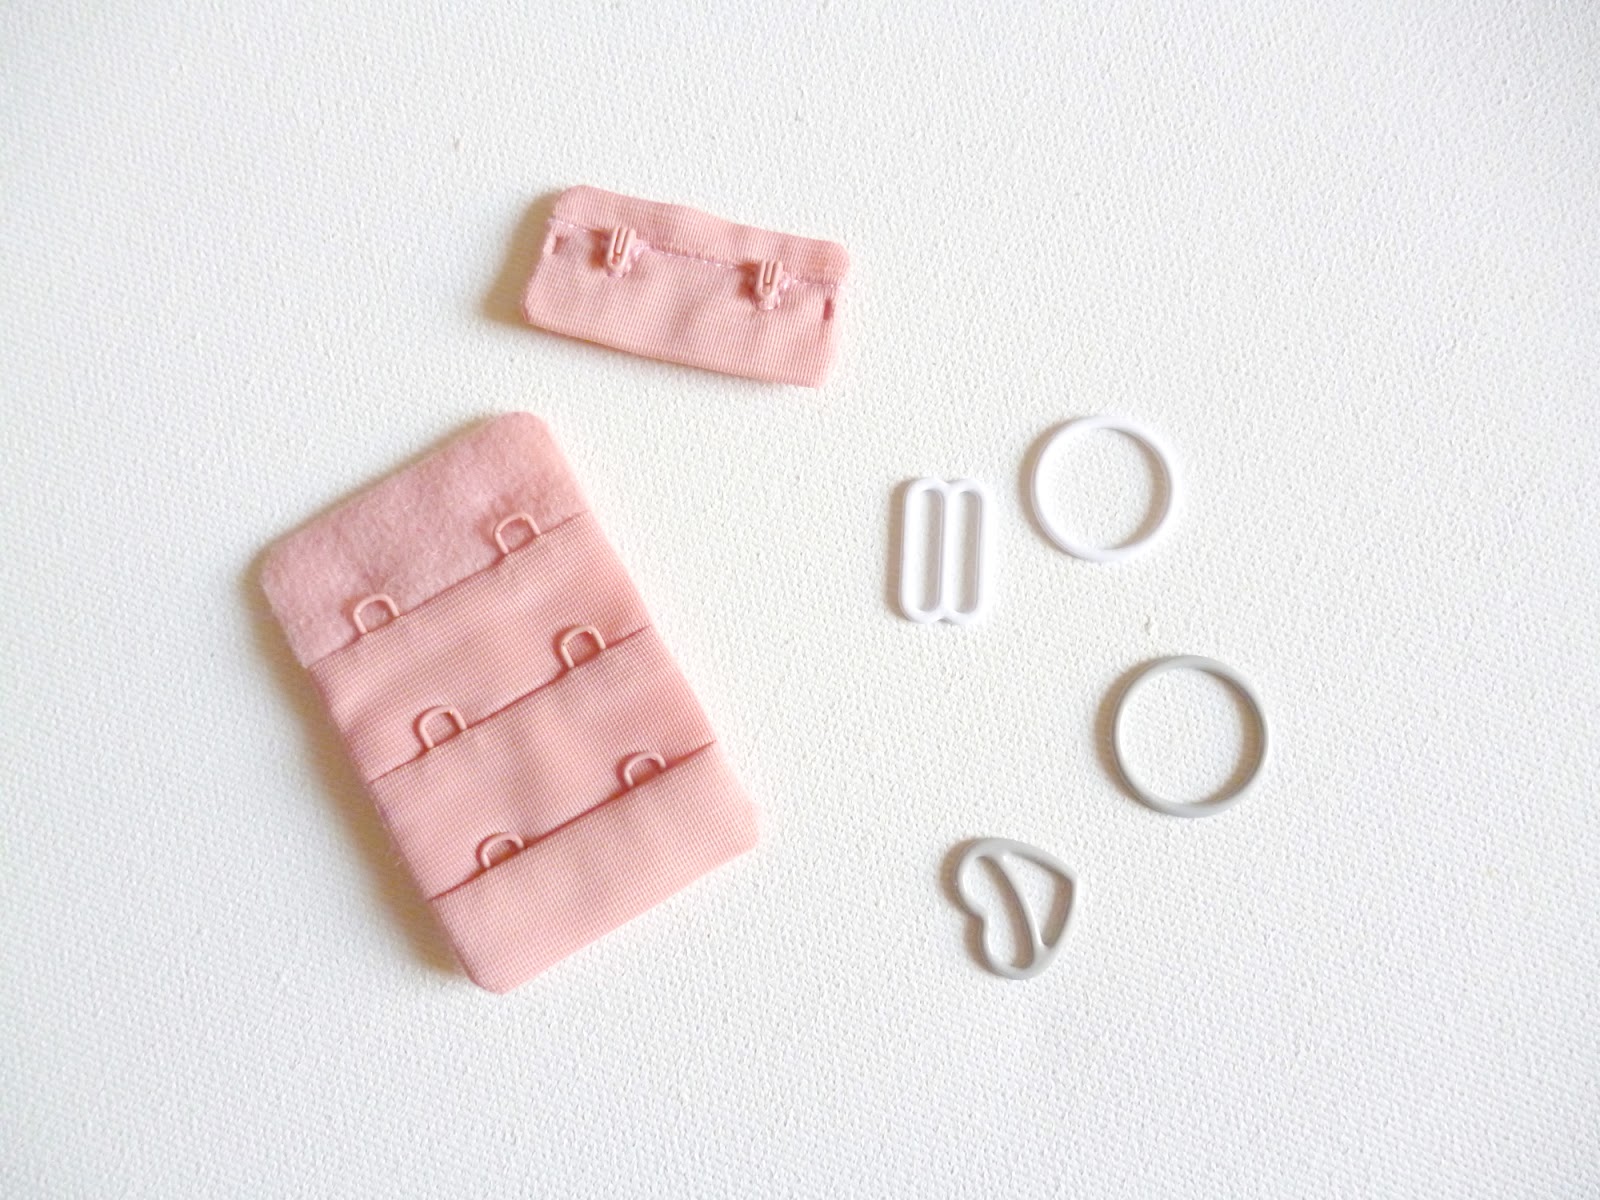
I am adding 1/2″ Seam Allowance to ALL edges.  I am applying a 1/2″ elastic to the top and bottom edges of my bra, so I am adding 1/2″ to the top and bottom edges of my pattern.  If you are  binding your top and bottom edges, do not add Seam Allowance.  If you are turning your edges under, add the appropriate amount of seam allowance.

For the Long Line Bra, the original Pattern instructions tell us to OMIT the darts for the lower cup. I sewed a couple of test garments, and this just doesn’t seem to work right for me.  So, I sewed a cup with just the FIRST dart, and omitted the second dart.  I also sewed a cup with both darts.  I found, for myself, the cup with both darts contoured much better than the cup with one dart.  If you are larger chested, a D cup or over, you will likely prefer the cup with 2 darts.  This version will require additional pattern manipulation.

I highly recommend you sew the cups both ways to see which one contours around your body best.  You literally just need to sew the cup and hold it over your… ahem… boob.

Follow below if you wish to keep both darts in the long-line version of the bra.

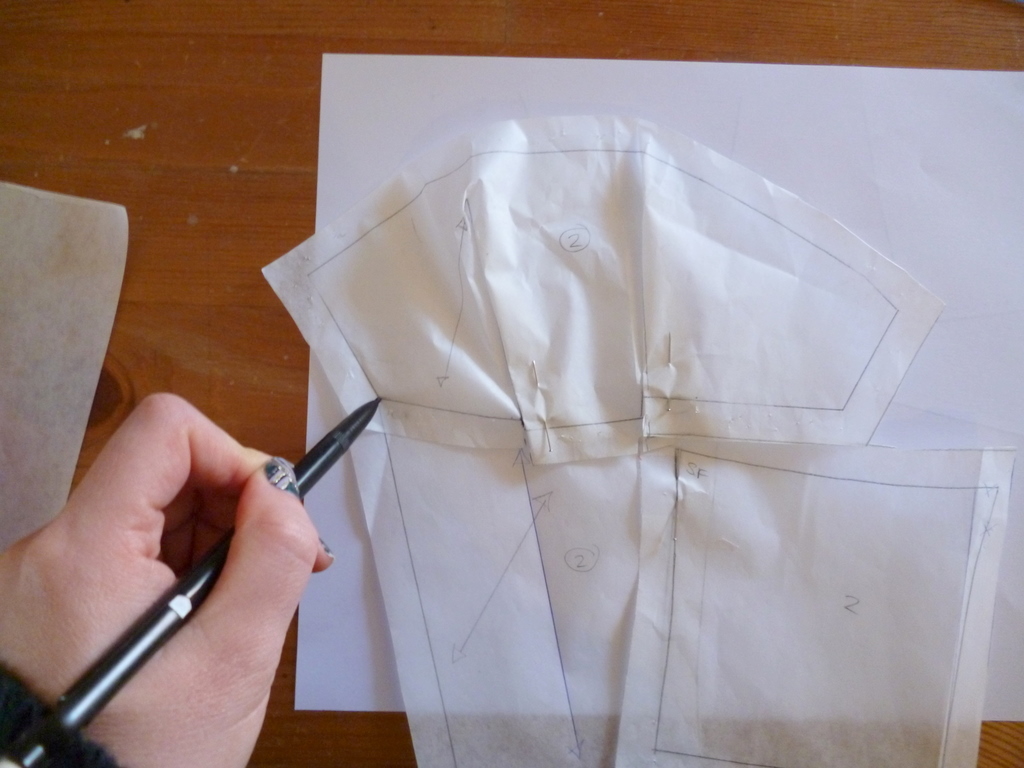
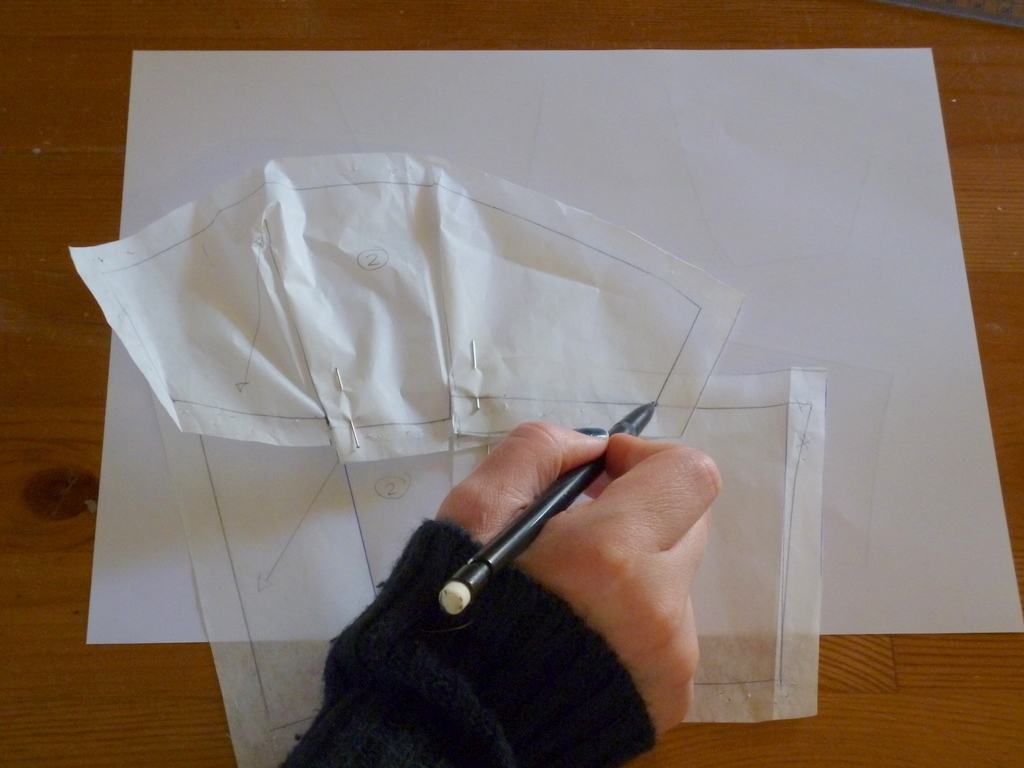
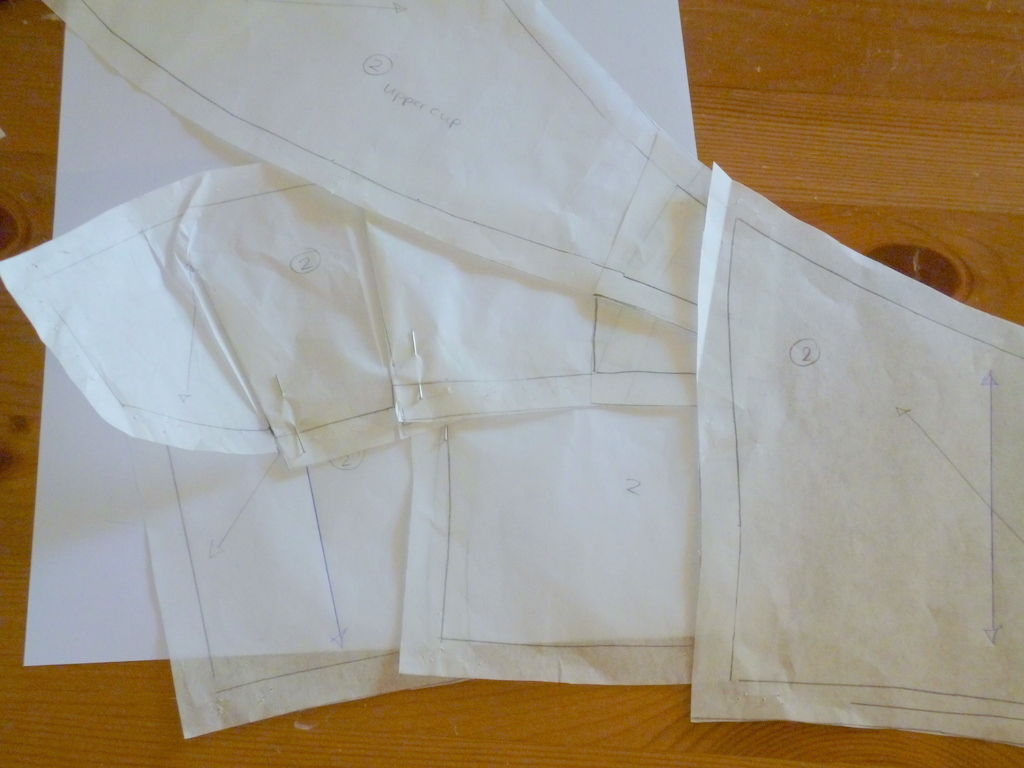
Start by closing your darts – I have just pinned mine closed.  I have also pinned my front corselette pieces together, stitching lines lined up.

Walk your lower cup along the upper edge of the corselette.

When you get to the end you will notice you are about 1 1/2″ short (or more, if you are cutting a larger size)

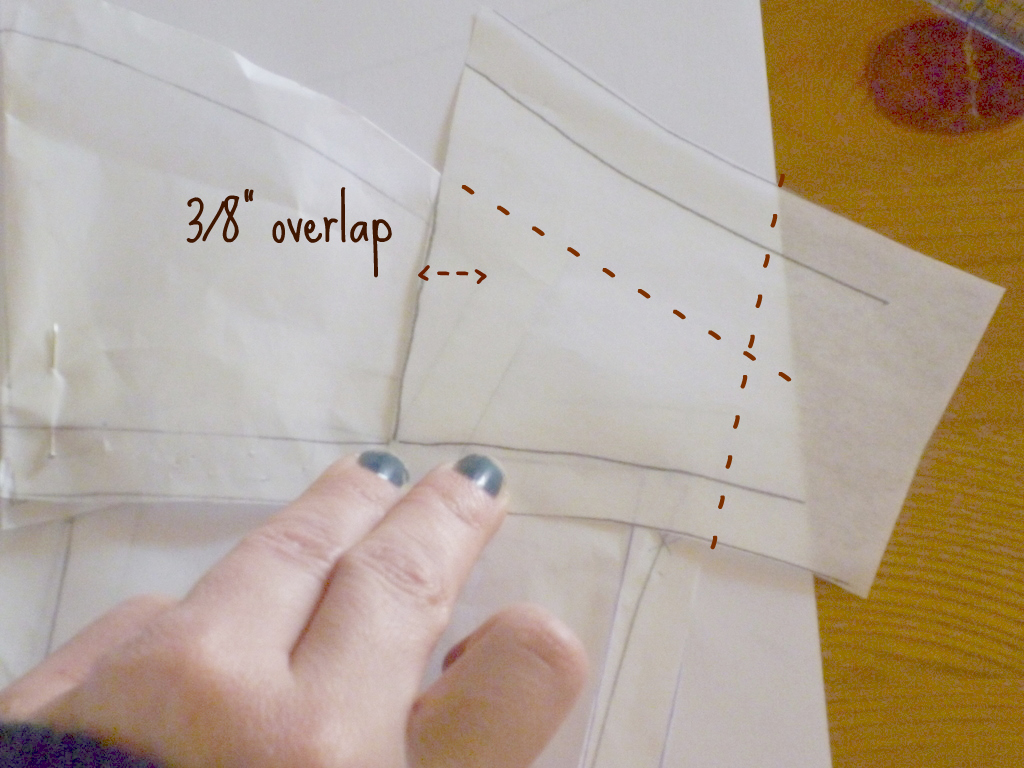
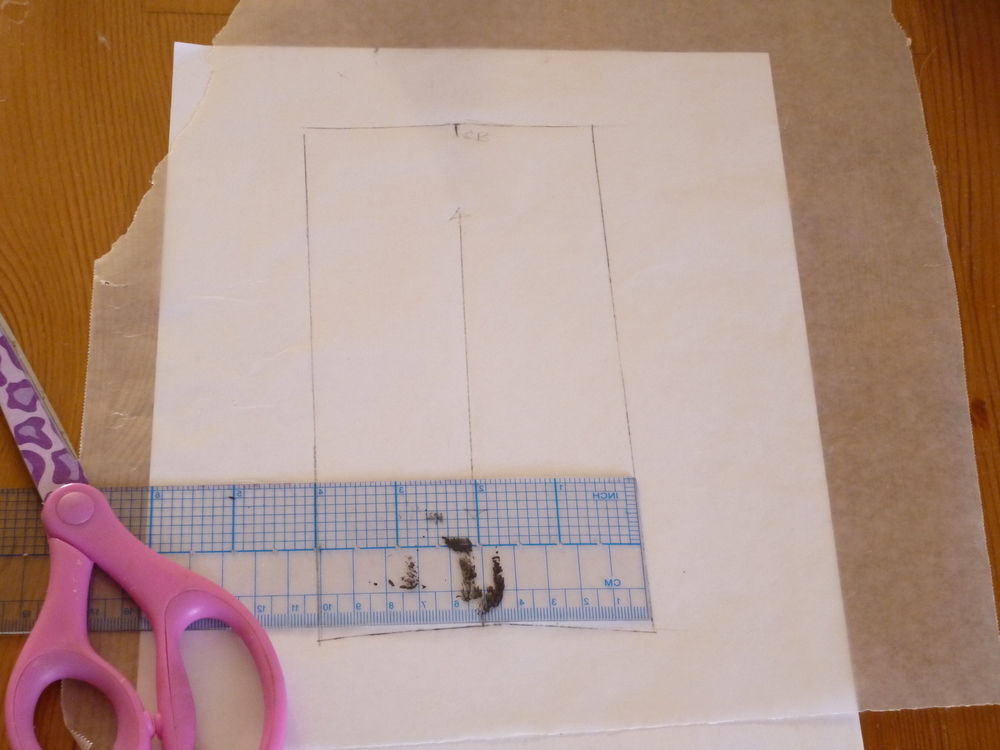
I traced a small portion of the back band to make an “Extension” along our lower cup.  Align the lower line so that it creates a smooth line along the bottom of the lower cup.  The side seam of the band should over lap the side seam of the lower cup in the top corner by about 3/8″.  Extend your cutting lines as shown below.

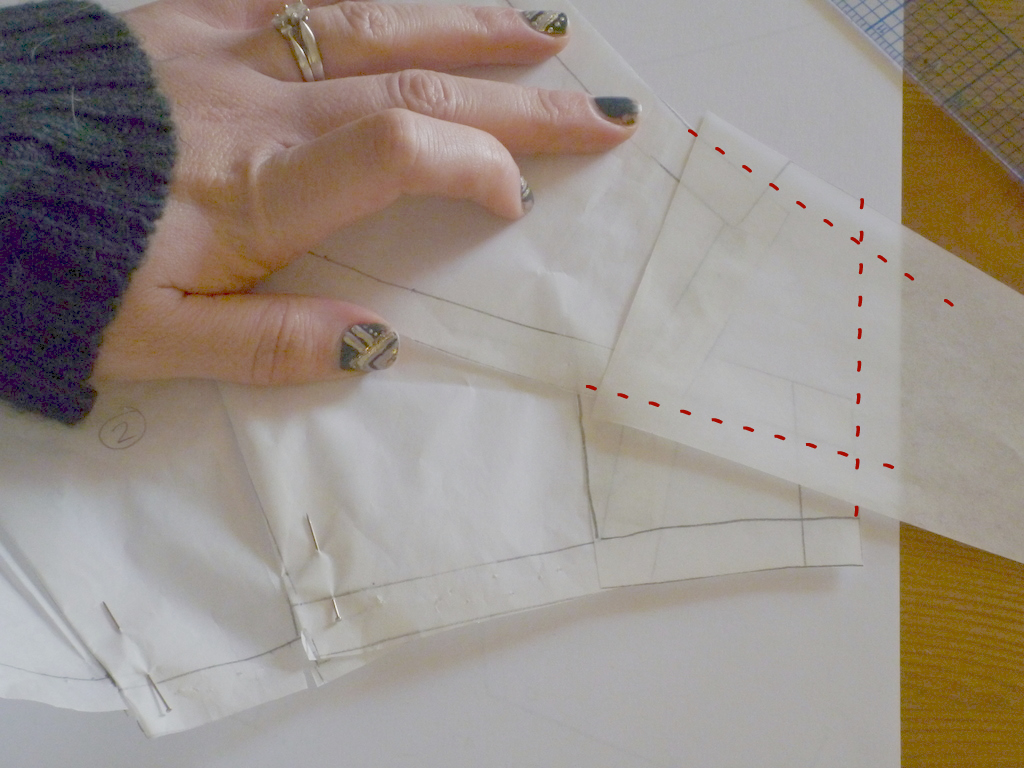
Walk you upper cup along the lower cup.  You’ll notice you are also short here.  Tape a scrap piece of tracing paper along the side seam edge of the upper cup. Extend your cutting lines.  The lower seam of the upper cup should follow the upper seam of the lower cup. Extend a straight line to form the side seam, using the lower cup side seam line as a guide.

 We now have an extension along the side of the upper and lower cup.  Walk your pattern to make sure your lines match.  I found mine was about 1/2″ short, which I then added along the top edge of my upper cup.

A note about grain lines: I am cutting my cups on the bias.  I am doing this because I want them to mould around my natural shape, but you can cut the cups on the straight grain as well.  I am cutting my corselet pieces on the straight of grain, but will be adding stretch lace for some give.

We’re now ready to cut out our muslin and test our fit!

Ooh La La Pin-Up Sew-Along Pt. 2… What you will need for your NEW vintage bra.

Uncategorized
We are on to part 2, and the more challenging part of our sew along: sewing our Pin Up Bra! 
Anna’s pattern comes in two styles, a short bra, and long line bra.  Of the two, the longline bra is the more challenging sew and will require some pattern manipulation which I will walk you through.
But now for the fun stuff, gathering your supplies.  There are so many ways you can finish this garment, so be creative and don’t be afraid to try something new.
I am using the same satin I used as an accent on my corset.  I’ve also gathered up some white stretch lace, which I will use as a contrast, and to give my bra  a little more give, and some nude coloured stretch lining (I chose a knit because I am cutting my cups on the bias).  I am going to edge my bra in cream coloured picot edged lingerie elastic, and I am creating a false band with plush back bra elastic, which I will also use for part of my straps.  I have hook and eye tape for my closure.

If you are sewing the short bra, you will need some kind of bra back closure.  You can use an S-hook, Hook and Eye closure, or a Vintage closure like Anna.  I will be adding adjustable straps to mine, so I’ve set a side some small o-rings and sliders.  I got these adorable heart slides on Etsy .

If you are for more of a reproduction look, skip the elastic and use some bias binding to finish your edges, and ribbon for straps.  You can also add boning to the side of the cups if you feel you need some extra support.

Are you excited? Nervous? Scared? Already finished?  Do you plan on sewing the short version or the long line version? I like this pattern so much, I think I will sew both!

Ooh La La Pin Up Sew Along: Printing Your Pattern & Adding Seam Allowances

Uncategorized
Anna has posted a similar post on how to print and use your pdf pattern – Please follow Anna’s instructions if you plan on using hook and eye tape to close your corset. If you are planning on using eyelets to lace your corset close, follow my instructions below!

Print out your corset garter belt pattern on regular, letter size paper, making sure the printer scaling is at 100%. Arrange each piece on a large work space. Cut and tape each corresponding piece together, like so:

Using tracing paper, trace each piece in your size. I am adding my seam allowance to my traced pattern pieces.
Once you have carefully traced each piece and all markings, add your seam allowance. I am using flat felled seams to encase my 1/4″ boning. I am adding a total of 5/8″ to each side of each panel, except for the centre front panel, which is to be cut on the fold. I have not added seam allowance to the top or bottom, because I plan on binding my edges.

For corsets that will lace – add 2″ to the centre back seam. This will form a facing. We will also need to draft an interfacing piece to reinforce this section.

Why do you need to face and interface this section? There will be a lot of pull on the grommets – if they are set through 1 layer of fabric they are going to work their way through in no time. You will also want to add boning along either side of the eyelets to prevent “scrunching” (ick!), and the facing will form your bone casing.

Measuring in 2″ from the centre back line, draw a line straight up (parallel to the centre back line).

Extend the interfacing pattern piece all the way along the 2″ extension so you get a large rectangular piece that looks like this:

Voila! Your pattern for an laced corset is complete! You are now ready to use your pattern pieces to cut out your muslin.

Ohh La La Pin-Up Sew Along – Planning!

Uncategorized

Anna wrote a great post on what you will need to prepare for the Corset Garter Belt Sew Along.

If you have never sewn lingerie before – please, don’t be scared! Lingerie can be made out of all sorts of fabric – from cotton to the finest silk. If you are a beginner, choose a sturdy cotton as opposed to a slippery satin. It will make your life much easier until you get your technique down pat.
Before you start your muslin, decide whether you want your garter belt to lace up the back with eyelets, or close with hook & eye tape. I will be sewing a lace up corset, and Anna will be sewing one with hook & eye tape.
If you choose to use eyelets and want a corset that will cinch you in, I would recommend lining or flat lining (sandwiching two pieces of fabric together, and treating them as one). I will be flat lining my corset with off white broadcloth. Adding a lining will give extra support and prevent unwanted stretching. It will also give extra support for the eyelets.
I’d love to know – who plans on using eyelets and who plans on using hooks and eyes? Are you planning a bedroom look or something for every day?

Ohh La La Pin-Up Sew Along!

Uncategorized

I am so so so excited! Anna, from A Few Threads Loose, came to me with a great idea – a co-sew along! If you haven’t seen Anna’s Etsy shop yet, she sells the best selection of vintage patterns and pdfs.

So, what will we be sewing? Lingerie, of course!

We have decided to start by tackling this amazing French Corset Garter Belt. Anna and I will both be posting instructions on our blogs and will be focusing on different techniques and embellishments you can use to make your garter belt truly unique!
To start off our Sew Along, Anna is giving away a pdf of the pattern above AND this beautiful bra pattern that we are hoping to Sew Along next! Head on over to A Few Threads Loose for a chance to win both patterns! Anna is also offering 15% off using coupon code “OOHLALA”.

Once you get your pattern – choose from either the single Pattern, or the Sew Along Kit (which comes with both patterns, and a vintage lingerie sewing booklet pdf) – there are a few things you will need:
1. Garter Clips – you can find these easily online, or in larger fabric shops
2. Eyelets and Eyelet punch, or 1/2 yard of hook and eye tape
3. Boning (optional)
4. 2 1/2 yards of fabric will do your corset & bra
5. 3 yards of bias binding OR 1 yard of contrast fabric for contrasting bone channels and bias binding
6. 2 yards of ribbon or cord for lacing (eyelet version only)
7. 1/2 yard of ribbon or elastic for attaching garter clips
8. Lace, Bows, Appliqués and embellishments of your choice (optional)
Anna will be working with a vintage peach satin for her garter belt. I will be using a blue & white cotton with pink satin accents, and white lace ruffles. I will demonstrate how to add contrasting bone channels, and how to reinforce your eyelet lacing to prevent any “scrunching” in the back. The laced garter belt will require some extra boning and a small piece of interfacing.
I am so excited to see what everyone comes up with!!!

1960’s Blouse

Uncategorized

I bought the pattern for this blouse ages ago and have made several versions of it! I made this one yesterday out of the same fabric I made my bra out of.

I really love this pattern. The front is bias cut and it doesn’t require a zipper. I did a single button closure on the back for a little extra room to slide it over my head!
I have also made the version with the cowl in the back, which I think is so sweet and unexpected. It is such a quick, easy sew, and easy to wear with a pair of jeans and a cardigan. I have a feeling I will get a lot of wear out of this one!

Vintage Vogue

Uncategorized

I made this plaid blouse several weeks ago but have just had a chance to take some pictures. I wear this top all of the time, and it is so cozy in the cold weather I’ve even worn it to bed! I made it of super soft, brushed cotton, and trimmed it in eyelet lace.

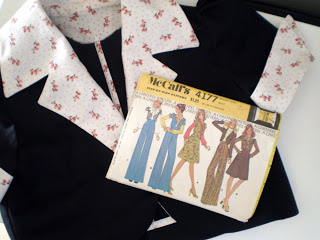
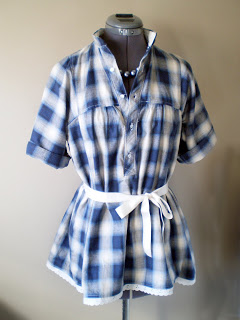
I was really excited about this project, since it had a lot of “tricky” sewing, including the placket and the most unusual yoke-sleeve contraption I’ve ever seen in my life!

I added a ribbon tie to the waist to make it a little more feminine. I often find sash-style belts kind of uncomfortable, so stretch and zig-zag stitched some wide elastic into the centre of the sash to add a little stretch to it.
My two days off are no coming to a close. I feel extra sad to have my days over today, I’m not sure why. I’m so tired of my day job… I’m finding it harder and harder every day to feel grateful for this job, even though I know I should be. Has anyone else had a job that they really disliked? If I lived in any other city, I’d just look for another job, but after almost a year of looking for work here, I’ve given up on that hope in that regard! So now I’m just trying to find ways to make the job I have (and hate) a little more bearable…

Betsey Johnson makes it Fast & Easy!

Uncategorized

Between family “stuff” I’ve actually been getting quite a bit of sewing done. I mentioned earlier, a Betsey Johnson pattern I had finished – I got this in a box lot of patterns and fell in love. It is SO Little House on the Prairie Meets Star Trek. The banded cap sleeve makes me giggle, but actually looks very cute on. I want to make a longer version for spring. This is completely the type of dress I could live in in the summer. Ah summer…
This was a very quick sew – as I mentioned in an earlier post, I took extra time to do french seams, a rolled hem, and lined the sleeve bands in broiderie angialise.
I also started on some more “ready made” stuff for My Etsy Shop including this knit “jacquard” set, which reminds me of the coziest pair of long-johns I had as a kid – perfect log cabin wear.

I’ve had this romper on my dress form for a few weeks. I love the print on this satin, it has cute little pink birds and reminds me of the 1920’s. I will make one of these for myself I think…
And last but not least, I sewed a bra before going to the visitation this afternoon. I like the gathered front. I sewed three little yellow buttons down the front and am contemplating a bow…
I am trying to kill some time between going to my Grandmother’s second viewing tonight… I’ve had a headache all week! The Funeral is tomorrow… even though it was an open casket viewing, it still hasn’t really “hit” me yet. My dad looks fantastic, which is good news, but I think he is getting cabin fever from not being able to go to work… or even go for a drive. While my cousin and I were preparing photos for the funeral, we found old wedding pictures of both of our parents. My mom and dad were such a good looking couple! I put one of their wedding photos up on my fridge to inspire…

Spring Jacket… in January!

Uncategorized

I purchased a huge lot of Vintage patterns off Ebay a few weeks ago, and received it early last week. It has some really special things in it, including a Betsy Johnson pattern from the late 1970’s. I really love the styling of 1970’s clothing – though I often dislike the original choice of fabrics. I am enjoying sewing these up in cottons and other natural fabrics.
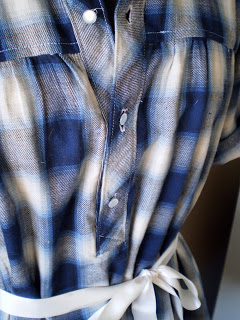
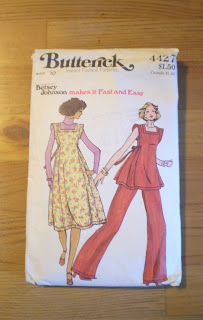
Maybe I am feeling extra inspired by the clothing of the ’70’s because we were into the 1970’s in our Oscar Movie Marathon. Last night I slept my way through The Sting but have thoroughly enjoyed The French Connection, The Godfather, and Midnight Cowboy and am really looking forward to watching Annie Hall again! It is one of my all time favourite movies – mostly because I think Annie Hall is a copy of myself.
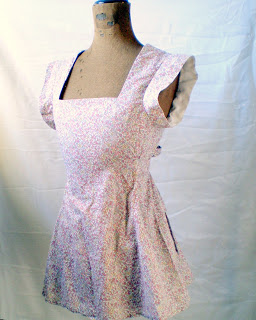
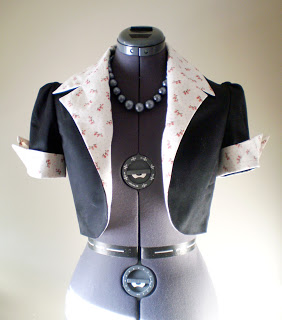
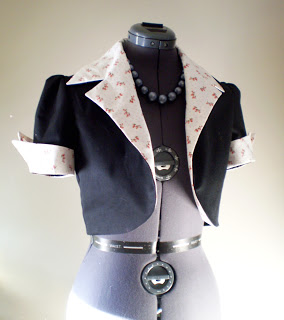
I am super excited about this little jacket – I love the idea of the contrasting lapels and pointy cuffs. It looks very cute with a pair of dark, skinny jeans, but I am excited to make myself a pair of wide-legged pants to go with it. I bound all the seams in the contrast fabric, and added a sewn on facing to the back-neck to hide the collar seam around the neck opening. I really liked the faux-notched collar on this jacket, was really quick and easy to sew!I am also preparing for the give away I mentioned earlier – I should be posting a Great Big Official Give Away Post on Tuesday! Stay tuned!