

So, if you’ve got your pattern, you’re ready to start. This is a really easy project, but requires some experience working with cloth cut on the bias, applying lingerie elastic, and sewing curves.
Because of varying amounts of stretch that your fabric might have, the sizing on this pattern is simply a guide – I’ve found that when using a woven front and back panel, I like to go up a size for myself, but depending on the amount of stretch in the bias, stretch in your side panels, and your body type, you might not find this necessary. This is why a toile for this garment is really important.
Print and assemble your pattern. Cut along the dotted lines sand tape together so lines match, just like you would with any pdf pattern.

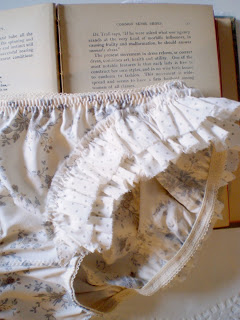
If you are using a woven fabric for your front and back panel, you need to cut your fabric on the bias. Here’s my “cheater” way. Fold your fabric at a 45 degree angle to the selvedge, and cut on fold. OR, you can trace out a mirrored image of front and back piece and cut it that way.
There is no need to add the crotch lining at this point, so just set the pattern piece aside.

Cut your size panels out of a fabric that has similar stretch to what your final garment will be sewn in.

Sew your front and back seams with a 3/8″ seam allowance, press to once side. Then, right sides together, sew your curved crotch seam.

Try’em on and adjust. When using a woven fabric you may find the legs feel a little snug – if so, trim the leg opening to be a little higher.

5 Comments
A.J.A.
April 15, 2012 at 11:01 pmHey Sarah, I just bought the pattern directly from you via Paypal (my husband's name on the account). I am excited to get started! What type of needle do you usually use for stretch lace and elastics?
heyrenee
August 4, 2012 at 9:18 amFabulous! I found this through Gertie's blog. The pattern link seems to be dead. I found the pattern in your pattern tab, but you might want to update it in the post. 🙂
I can't wait to get my sewing machine fixed and try this out!
sarah.e.norwood@gmail.com
August 4, 2012 at 12:44 pmThank you! Yes, I have done some "Renovations" since this post – I will fix the link now 🙂
Mrs. Neu
July 17, 2013 at 3:06 amFound you through Gertie's blog as well… after seeing her post and the amazing pairs she made, I exclaimed to my husband how if I had a serger that I would make tons of these… he got me the serger and I got me the pattern! I'm so excited, I can't wait to post my finished product!
Richard C. Lambert
February 13, 2016 at 6:28 amSo, if you've got your pattern, you're ready to start. This is a really easy project, but requires some experience working with cloth cut on the bias, applying lingerie elastic, and sewing curves.my site